Outside View

Outside View
The Exterior View of New Orleans Townhouse

Sunday, August 30, 2015

Raise The Roof!

The original arrangement of the rooms in the dollhouse never worked for me but I could see potential if I thought about it long enough. The question of where to put the bathroom just nagged at me. The room often shown as the bathroom was quite an awkward space. The angle of the ceiling was extreme leaving only a third of the room useable. I looked around my workroom and thought about the large dormer on my bungalow and went for it. It was very scary cutting that large hole in the roof and not knowing how to fix it if it was a a mistake.
 I need to touch up a few spots on the dormer, the paint is still wet on the roof.

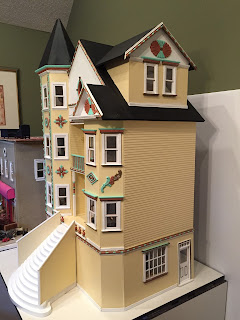
 I added trim and windows on the large dormer to match the design of the front of the house.


 I drew my guidelines and used my jigsaw to cut the hole out. I made my usual foam board mockup and tested it several times. The blue line eventually be came my cutting line.
I decided on a flat ceiling inside the dormer to make it easy to install a light and it also made the room feel more comfortable. The peak area above is dead space.
After I raised the roof line, the room was now a larger room and my bathroom furnishings looked sparse so I turned it into a bedroom for "someone special" instead. 


I added two walls and a door to the rear of the boy's room and converted the nonfunctional space of the tower into a bathroom. 

Now my bathroom is the perfect size for the furnishings, I even have space for a wicker shelf behind the door for storage.
I going to install a battery operated ceiling light and keep the top of the tower roof removal to provide direct access to the room from above. 

Monday, August 17, 2015

Nautical Theme Bannister

The little boy who will live in the Painted lady Dollhouse is wearing a sailor suit and holding sailboat so I'm going with a nautical theme for his bedroom. I had an inspirational thought while trying to keep this bargain house on a budget. I found these unfinished wood appliqués and had originally planned to make his bed until I found the perfect one already made.


I used the wood appliqués shaped like crabs, square dowels and left over trim from the dollhouse. 

Sunday, August 9, 2015

Finished Exterior of the Frankenstein House a.k.a Painted Lady Dollhouse


I see why I never used shingles before because they like to buckle


Sorry I have not posted in awhile. I suddenly realized summer was ending and got a jolt of energy to accomplish something off my miniature to do list. I had a difficult time with piecing together this "bargain" dollhouse. I still have a few touches to do and some things were still drying when I took the picture. I knew what I wanted to do but just didn't know how to accomplish it at all or at the level of professionalism I desired. If I was more experienced this would not have been such a chore. When I stopped being hard on myself things started to pick up pace.

I didn't like the original window choice anymore and decided to selected windows that more closely matched the original design. I bought windows from Hobby Lobby and Miniatures.com. They looked alike but the sizes some how were off with the windows and everyone was different. I could not figure out why sometimes they fit the openings and sometimes they didn't. So I would go back and cut the openings bigger and then the window would be to big. In the future I will buy all windows from the same place. I decided to mix the styles since the house was asymmetrical anyway. I filled in the gaps with wood filler the best I could and just kept going.

I had a hard time picking a shade of yellow. I looked around my house for color inspiration and found a beaded necklace and decided to add terra-cotta along with the mint. The house looked plain and I needed to make it look more like a Painted Lady. So I added trim I bought from Home Depot and wooden appliqués from Hobby Lobby and lots of paint.