Outside View

Outside View
The Exterior View of New Orleans Townhouse

Friday, December 30, 2011

Country Church Dollhouse


This is the cover picture
I think this purchase is going to be my first and last purchase internationally through eBay. It is really frustrating when you are mentally ready to start a project and can not. I ordered display cabinets over a month ago and still have not received them and it is passed the delivery date, the seller had excellent reviews but so far I am disappointed. So I have decided to begin work on my next upcoming project, the Country Church Kit by Real Good, that I have had at least ten years. I started it but never finished due to space, this church is huge, it as big as the Mountfield without the bell tower and steeple. I bought some figurines of church people in pews, choir and minister about the same time I started the church. They are similar to the resin dolls.

My husband and I were out of town for the holidays and drove past this church and I knew right away what I wanted to do with mine. He got out and took these pictures. I wish we could have gone inside.


One of the blogs (otterine.com blog) I follow is working on a haunted looking house that is showing its age and I loved the crackle finish she did on the siding. My church already has the siding milled which will be easier. She also did a tin rusted roof technique I am thinking about as well. I really admire her work.

Yesterday my "favorite" aunt gave me a e-certificate for my birthday and Christmas present to hobby builders/miniatures.com and I bought this table and two of these chairs that I plan to use in the church. I might age them a little with paint.

Wednesday, December 28, 2011

Good Idea Gone Bad ...I Think

While, I am excited about the bakery, I am dreading the idea of doing the bricking of the exterior, and my design "idea" included the inside of one interior wall. I feel that using the stencil and the brick compound is easy and less time consuming than cutting the brick from egg cartons, although I have never tried it.

My Problem: Brick compound is limited in colors and the MDF is heavy

Soooooo, I came up with the great idea of using a wood burner and a brick stencil (I was planning to trace the pattern onto the board) and spraying the whole thing with stone textured paint like I did on the outdoor fireplace and the vinyl brick sheet. 

Then I started to think AFTERWARDS can you do pyrography (wood burning, I just discovered the formal name) on MDF? Many internet searches later no one knows for sure but the general idea is NO, due to the chemicals that bind the sawdust. But some say a mask and working in a well ventilated area (outside for me) and seal it with latex paint. Michaels had the "Creative Versa-Tool" on sale for 19.99 reg. 29.00, it does a lot of cool stuff (hot stamping and craving, wood burning, leather crafting, image transferring, etc.) so it was not a bad buy if I do no use it for this job.

2nd Plan: Use builders' foam from home depot and carve the brick pattern in with the hot knife tip and paint with acrylic.

Still thinking...

Tuesday, December 20, 2011

My New Business-Scratch Build Bakery Dollhouse


I have always wanted a miniature business, when I was younger I bought the Brimbles Mercantile kit. I still have it in the original box. I saw my notes I wrote on the box my idea was a bridal shop, hmm, I still might one day. But walking downtown this summer I fell in love with this building, I got some pictures off the Internet of the inside and loved the layout. I thought about kit bashing the Brimbles but I felt uncertain. Instead of using the kit I decided to try at designing a copy of the 390 building and another cafe I saw. I really want to make food so born the bakery cafe idea.

 My version is going to be a combination of these two buildings. I am still wanting on some display cabinets I ordered from eBay to arrive, so I am playing around with the layout. I was thinking of using the upstairs as a sitting area sort of like a internet cafe or an office for a small design firm like the real 390 building once had in it.


My very first dollhouse in miniature

I don't remember how old I was or who bought it for me but it was love at first sight, The Fisher Price "Play Family House". I had been thinking about it every since I saw it on one of my favorite blogs. I even went on ebay and thought about buying one last month. Then yesterday while in Kohls I decided to browse the ornaments and there it was with the Hallmark Keepsake ornaments.  I thought how cute it would be to have in my dollhouse the one that started it all.  The doorbell actually works like it did on the real thing. So Kendall doll is getting it for Christmas, but don't tell her it is a secret.:) I took the pictures with my new iphone and I can tell the different between the old phone.


Saturday, December 17, 2011

Christmas Time Is Here with Mini Christmas Lights!

I have seen some nice miniature Christmas decorations. I was in Michaels and they had a 50% off sale on the Lemax Christmas Village. I saw some mini lights and at my husband's suggestion decided to decorate my Mountfield Dollhouse for Christmas. Since my mini family is expecting family for Christmas they decided to spruce things up for the holidays.


Sunday, October 9, 2011

Mountfield Dollhouse Garage

I think I need a Dollhouse Garage! Why? Because I bought a clearance kit in Atlanta while visiting the Atlanta Miniature Show and I have two cars and they need a home anyway. I was so excited I started sketching on the way back home. The kit had no instructions and I decided to wing it. I tried to complement the design of the house.
Some of these details changed
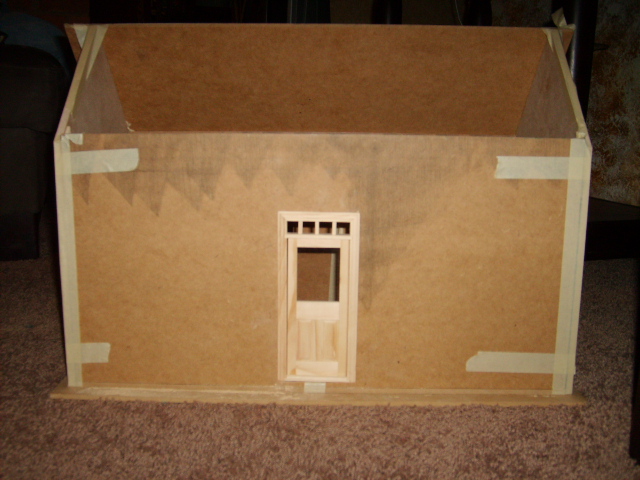
I began by tracing the some of the pieces onto foam board. I decided to use the original two side pieces and double the front piece with the working garage door to make a two car garage.


I bought some MDF and had a co-worker to cut out the parts using the foam board as a template. I got the MDF at home depot for under $6 a board, which were large enough to use on three boards for the whole garage. This is also the board that I had cut in half as the base for my gardens.  I ordered a second garage door for the additional opening and coach lights matching the ones by the front door.


While at the Miniature Design Shop, I came across something that I have been looking for since I started my dollhouse...attic stairs that fold up, I could not believe it! I decided to use them in the loft storage area over the garage. I dry fit the MDF parts to see how everything together would look.


Ladder flipped to face the front


I have painted the walls and roof with the same latex paint color that I used on the house for the brick mortar color.

I am adding the half timber and stone to match the house and I originally planned to add the brick but I thought it might be too much against the house and I started having flash backs to the three weekends it took me to brick the house! I masked off the area that I did not want in stone with tape and used the same stone texture paint that I had used on the house. I have decided to use a face mask in the future with this spray paint even outside it is very strong and the smell gets in your clothes.


I lined all the walls side-by-side to make it easy.


While waiting for the walls to dry I cut and painted the timber and doors. Once the pieces were dry I added the timber.

I changed my mind about the insert color


Considering the brick exterior still

Then I assembled it again to see what areas would show that needed painting and later painted the interior white. I taped the garage door supports inside to check the alignment and the space with both doors in place. When I originally did my foam board mock up I did not have both doors, which I found out was indeed a problem when the loft stairs let down. The space between the supports is tight. Also the doors are very "fragile" the rollers come off very easy and the doors do not smoothly operated up. I think I read somewhere to use soap as a lubricate, still working on those issues. I cut some large wood beams and placed them in the corners to use as support in the garage for the loft floor/ceiling.


I used the stone texture on the floor.

I could not resist!
 One support is upside down...oops.

I started stenciling the roof until I started to get sleepy.


Well, that was as far as I could get in one weekend! I had to get as much done as possible before my husband came back in town from a business trip and saw the mess I made all over the house. The sketch and the foam board mock-up I cut out and taped together that Sunday afternoon/night when we returned home from Atlanta, the boards were cut midweek, everything else I did from Friday about 6:00pm until Sunday about 8:pm, until my husband made me stop to sleep.