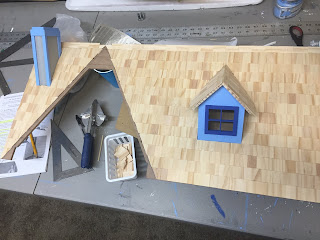
I used Quick Grip Glue this time:) and I decided to paint instead of stain. I was going for a weathered look. I have not used shingle dye before and I wasn't sure it would give me the effect I wanted. I can fix any mistakes better with paint.
I used Americana Decor Chalky Finish in "Artifact" which is a medium gray, as my base color. I used FolkArt Home Decor Chalk for shading-Maui Sand, Castle, for highlights Parisian Gray and Spanish Moss-for a little moss effect.
I am sure most of you know how to shingle, so this is really for me and anyone else who is intimidated by shingles. (So I will know what I did good or bad in the future).
I decided to shingle my roof unassembled and flat. I felt I could see my mistakes better and I could paint without worrying about the house underneath.
I drew the lines according to the directions; I used a whole shingle for the first starter row and added an inch in-between lines.
I painted and glued the chimney and dormer window I bought to the roof.
I glued the gable together only.
Once dry, I reassembled the roof with tape and placed it back onto the house. The attic ends were already permanently attached to the house for support.
I drew the outline of the gable roof on the front roof, so I could see what area not to put shingles.
I started the process of shingling and trimming shingles along the gable outline as I went row by row. Once I had finished the shingles, I started painting the roof after 24 hrs just to make sure it was set.
 |
| I went back and touched up a few areas once it dried |
On a little side note this is my new favorite, Bench Circular Saw.
I have a large table saw in the garage but it is not safe to cut these small parts. I developed tendinitis in my wrist from cutting small parts for the porch and beds by hand. I knew there had to be a better way. I found this on Amazon and after the first couple of cuts it had me at "Hello". The cuts are so straight and precise, love it.


